Sunday, November 6, 2011

Hawaiian Chicken


Seriously one of the easiest dinners ever! I served it with a steam-in-the-bag veggies and wild rice. Prep time? About 2 minutes.

Serves: 2

Ingredients:
  ~ 2 boneless skinless chicken breasts
  ~ barbecue sauce
  ~ 1 can crushed pineapple (diced pineapple also works)

Directions:
1. Pre-heat oven to 350°.

2. In a bowl, combine the barbecue sauce (I didn't measure), pineapple and about half of the juice in the can (drink the rest).

3. Place chicken in a baking dish.

4. Pour barbecue/pineapple mixture over the chicken.

5. Cover with foil and bake until the chicken is completely cooked... about 40 minutes.

Thursday, August 11, 2011

Ginger Pineapple Chicken

Three of my favorite ingredients.. chicken, pineapple, and my new favorite, ginger. This is the perfect busy weeknight dinner. It took less than 5 minutes to prepare (the oven took longer heating up), dirtied 2 things (a bowl and the pan), and you most likely have all the ingredients already. To me, that is weeknight perfection.

Serves: 2

Ingredients:
  ~ 1 1/2 lbs boneless skinless chicken breasts
  ~ 1-2 teaspoons rosemary
  ~ salt (to taste)
  ~ pepper (to taste)
  ~ 1 can of sliced pineapple
  ~ frozen broccoli or thinly sliced green onions
  ~ 1 teaspoon ground ginger

Directions:
1. Pre-heat oven to 375°.

2. Combine the salt, pepper and rosemary in a bowl, then use to coat the chicken breasts.

3. Place the chicken in a 9x13 glass pan and sprinkle the broccoli or onions around the chicken (we don't eat onions, which the original recipe called for. I used frozen chopped broccoli).

4. In a small bowl, combine the juice from the can of pineapple with the ground ginger. Beat until the ginger is completely dissolved. Pour over the chicken. It will look like a lot of juice, but you need to use all of it.

5. Bake, uncovered, for about 35 minutes. Baste with juices several times.

6. After 35 minutes, add the pineapple slices on top of the chicken (half the can would be sufficient. We like pineapple so I used all of them).

7. Bake for another 5-10 minutes, depending on your oven. Serve over rice, with the juices drizzled on top.


Source: southernfood.about.com

Monday, July 18, 2011

Chinese Honey Chicken

We've been in the mood for some really good Chinese food lately, but we're trying to save money and not go out to eat. While looking online for something to make for dinner tonight, I came across this and thought it would be perfect. It came out really good.. like something you'd find in a restaurant.

Serves: 4

Ingredients:
  ~ 1 1/2 lbs boneless skinless chicken breasts or tenderloins
Batter
  ~ 4 tablespoons cornstarch
  ~ 1/4 cup flour
  ~ 1 teaspoon baking powder
  ~ 1/2 cup water
  ~ 1/2 teaspoon salt
  ~ 2 eggs
Sauce
  ~ 1 1/2 teaspoons oil
  ~ 2 teaspoons ginger
  ~ 3 tablespoons garlic (I used about 1/2 teaspoon garlic powder)
  ~ 1 teaspoon salt
  ~ 3 tablespoons honey
  ~ 1 teaspoon rice wine vinegar (I used apple cider vinegar)
  ~ 1/2 cup water
  ~ 1 teaspoon cornstarch (mixed with 1 teaspoon water)
  ~ sesame seeds (optional)

Directions:
1. Beat all batter ingredients together in a large bowl until smooth. Cover and put in refrigerator for at least a half hour.

2. Heat a deep fryer (or oil in a large frying pan) to 350 degrees.

3. Cut chicken into 1" chunks and add to batter bowl, making sure each piece is completely coated.

4. Add chicken to pan and fry until batter becomes firm and crispy. Drain on a paper towel.

5. In another frying pan, heat 1 1/2 tablespoons of oil, garlic and ginger. Stir fry for about 30 seconds, then add the salt, honey, vinegar and water. Mix well (I used a whisk).

6. Combine 1 teaspoon of cornstarch with 1 teaspoon of water and add to the sauce. Allow sauce to simmer for 2 minutes or until it looks thick.

7. Add chicken to sauce pan and make sure each piece gets completely coated. Sprinkle with sesame seeds if desired.


Source: blogchef.net

Friday, July 8, 2011

Blueberry Muffins

Blueberries are one of my favorite fruits. It's like potato chips.. you eat one and before you know it you've eaten all of them. Blueberries were crazy cheap at our favorite grocery store last week so I bought a bunch... and what better to make than blueberry muffins!

Makes: 1 dozen (I doubled the recipe and made 12 big muffins and 24 mini muffins)

Ingredients:
  ~ 1 3/4 cup flour
  ~ 1/3 cup sugar
  ~ 2 teaspoons baking powder
  ~ 1/4 teaspoon salt
  ~ 1 egg, beaten
  ~ 3/4 cup soy milk
  ~ 1/4 cup vegetable oil
  ~ 3/4 cup blueberries, washed (I used the whole container when I doubled it)

Directions:
1. Pre-heat oven to 400°.

2. In a medium bowl combine flour, sugar, baking powder and salt with a wooden spoon.

3. Using the spoon, create a bowl out of the dry mixture.

4. In a separate bowl combine egg, soy milk and oil. Pour wet mixture into the dry mixture "bowl".

5. Stir until moistened... not too much though. Lumps are good. Fold in blueberries.

6. Spoon batter using an ice cream scoop into muffin pan (if you're not using muffin papers, spray the pan with cooking spray). Each muffin cup should be approximately 2/3 full. Sprinkle a little sugar on top of each muffin.

7. Bake for 18-20 minutes, or until a cake tester/toothpick inserted in the center comes out clean.

8. Allow the muffins to cool for about 5 minutes and serve warm with butter.


Source: Better Homes and Gardens Cook Book: Bridal Edition

Wednesday, July 6, 2011

Teriyaki Tuna Bowl

I'm always looking for healthier dinners.. and inexpensive dinners. A year ago I tried "Meatless Mondays", but I started slacking after a couple weeks. Sometimes I found I was just too tired on Monday to plan a special meal and it has historically been a day of a go-to easy quick meal. But I would still try to do a meatless meal every once in awhile. It's tough because we're both big meat eaters.. so for us to feel full and happy after a meatless meal, it better be good. I've found that tuna is a good substitute. Sometimes I can put it in stuff and it tastes just like chicken.

Today was a really really hot day.. not only too hot to cook, but too hot to eat a hot dinner. I bookmarked this recipe back during my Meatless Mondays days, and it's basically a cold dinner, so I gave it a shot.

I liked it. I liked how long it took to make. I liked that it wasn't burning hot. And I liked the taste. Not the best dinner ever, but good. Ryan didn't agree. He ate all of his, but he said it wasn't one of his favorites. It reminded me of these tuna packets that Bumblebee used to make a couple years ago with a couple large pieces of teriyaki marinated tuna. Ryan liked those... this wasn't that different.

And it's healthy! According to the Bumblebee website, only 230 calories per serving. And I made half as much rice as they did, so it was probably a little bit less than that.

Serves: 2

Ingredients:
  ~ 1 can of tuna, drained
  ~ 3 carrots, julienned
  ~ 1 cup broccoli
  ~ 2 cups rice, cooked
  ~ 1/4 cup teriyaki sauce (or a little less.. depends on how strong of a flavor you want)

Directions:
1. Prepare rice according to package directions.

2. In a sauce pan, boil or steam broccoli and carrots.

3. When the vegetables are cooked, spoon the rice into the bottom of a bowl or dish. Top with the vegetables and tuna.

4. In a microwave dish, heat up teriyaki sauce for 15-20 seconds... just until slightly warm. Drizzle over bowl.


Source: BumbleBee.com

Tuesday, July 5, 2011

Double Chocolate Oreo Chunk Cookies

I made these for a couple bbq's over 4th of July weekend. They went over really really well.. as in they disappeared within minutes! And of course, like the blogger I got the recipe from, I also taste tested them while I was making them. Seriously delicious cookies!

One of the bbq's was also for my aunt's birthday, and she is the biggest Oreo fan I've ever met, so they were perfect for her party! They were Oreo fan approved!

Makes: 3 1/2 dozen cookies

Ingredients:
  ~ 2 1/2 cups flour
  ~ 1 teaspoon baking soda
  ~ 1/4 teaspoon salt
  ~ 3/4 cup unsweetened cocoa
  ~ 1 cup unsalted butter, softened
  ~ 2 cups granulated sugar
  ~ 2 eggs
  ~ 2 teaspoons vanilla
  ~ 1 cup semi-sweet chocolate chips
  ~ 1 cup chopped (or crushed) Oreo cookies (about 8 Oreos)

Directions:
1. Pre-heat oven to 375°.

2. In a medium bowl, combine flour, baking soda, salt and cocoa.


3. In a mixer bowl, cream butter and sugar until smooth. Add eggs and vanilla. Mix until well blended.


4. Gradually add flour-cocoa mixture until everything is well combined.


5. With a wooden spoon, mix in Oreos and chocolate chips.


6. Using a tablespoon, drop cookies onto a cookie sheet (I usually use an ice cream scoop to get evenly sized cookies).


7. Bake for 8-10 minutes. Allow cookies to cool on cookie sheet for 3-5 minutes before transferring to a cooling rack (I played around with these times and found that 9 minutes in the oven and 3 minutes cooling worked the best for me).


8. Eat a couple, just to test them before anyone else gets their hands on them!


Source: Two Peas and Their Pod

Friday, July 1, 2011

Glazed Lemon Chicken and Rice

I love anything lemon, and while this was really good, it didn't have enough lemon for me. The glaze smelled amazing though!! Next time I make it I'll be adding more lemon juice.

Serves: 2

Ingredients:
  ~ 1/3 cup water
  ~ 1 tablespoon lemon juice
  ~ 2 teaspoons cornstarch
  ~ 2 tablespoons honey
  ~ 1 teaspoon grated lemon peel
  ~ 1 cup uncooked instant white rice
  ~ 1 teaspoon vegetable oil
  ~ 1/2 lb boneless chicken breasts, cut into 1" pieces
  ~ 1/2 teaspoon salt

Directions:
1. Combine water, lemon juice, cornstarch, honey and lemon peel. Stir until cornstarch is dissolved.

2. Cook rice according to package (for me it was 1 cup of water for 1 cup of dry rice, cooked in the microwave for 5 minutes).

3. In a medium-sized skillet, heat the vegetable oil. Add the cubed chicken when the oil is hot enough. Cook until brown.

4. Stir glaze mixture again (in case anything settled while you were cooking the chicken), then pour into the skillet.

5. Constantly stir the glaze until all of the chicken is coated and the glaze has thickened.

6. Serve over rice.


Source: Betty Crocker

Friday, June 24, 2011

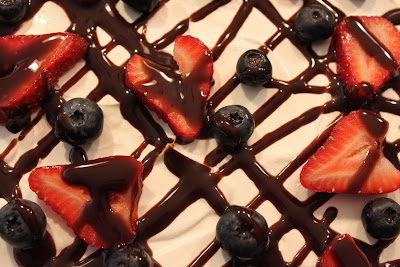
Chocolate and Berries Yogurt Dessert

This was a huge hit at a recent bbq I went to! Yummy, sugary, frozen dessert topped with fresh fruit!

Ingredients:
  ~ Chocolate chip cookie base (I used this recipe, but you can use any double chocolate chip recipe)
  ~ 1/2 cup fresh strawberries (or raspberries)
  ~ 4 containers Yoplait Whips strawberry mist yogurt (or raspberry mist) **I'm pretty sure this has "bad" dairy in it. Yogurt is okay for people allergic to milk, but there are some additional lactose ingredients in the "Whips". I made a dairy-free version using regular Yoplait strawberry yogurt and it still worked.**
  ~ 1 cup whipped cream (or this dairy-free version)
  ~ 2 tablespoons hot fudge topping (I used Hershey's chocolate syrup)
  ~ 1 cup fresh blueberries

Directions:
1. Prepare cookie recipe.

2. On a greased cookie sheet, drop cookie dough by tablespoonfuls to make 6 cookies. Bake according to recipe. Remove from cookie sheet and cool on a cooling rack.

3. Press the remaining cookie dough into the bottom of a springform/cheesecake pan. Bake for approximately 15 minutes (because it is thicker than a normal cookie the cooking time can vary). Cool completely, about 30 minutes.

4. In a medium bowl, combine 1/2 cup raspberries or strawberries and yogurt. Spread evenly over cooled cookie crust.

5. Crumble the 6 cookies and sprinkle over the yogurt layer.

6. Carefully spread the whipped cream over the cookie crumbs (I found that using a frosting spreader worked really well).

7. Freeze covered for 4 to 5 hours, or until firm. Will also freeze well overnight.

8. About a half hour before you plan on serving, remove from freezer and remove the sides of the pan.

9. Drizzle some chocolate sauce over the top of the whipped cream. Top with blueberries and remaining raspberries/strawberries. Drizzle with more chocolate sauce.


Source: Betty Crocker

Wednesday, June 22, 2011

Amazingly Delicious Dairy Free Whipped Cream

After many many trials, I finally found a dairy-free whipped cream recipe that actually tastes really good. The one I posted on here before tasted good mixed in with other things, but not by itself. This one I was having a hard time not eating it with a spoon!

Ingredients:
  ~ 1/2 cup soy milk
  ~ 1 cup powdered sugar
  ~ 1 teaspoon vanilla
  ~ 3/4 cup vegetable oil

Directions:
1. Combine soy milk, powdered sugar, vanilla and 1/2 cup vegetable oil in blender. 

2. Add remaining (1/4 cup) vegetable oil.

3. Blend until it has a consistency similar to "real" whipped cream.

4. Taste it to make sure that it is sweet enough, and add more of necessary ingredients. Depending on the soy milk you use, you may need to add more sugar and/or vanilla.

Monday, June 20, 2011

Jello Frosting

Very very easy frosting recipe. Great because you can make any flavor you want (I can't wait to try it with some fun Jello flavors like Peach or Pina Colada). Doesn't keep well though, so make it the day you're planning on serving it. It starts to separate when it's refrigerated. Tastes a little like meringue.

Ingredients:
  ~ 1 3oz. package of Jello
  ~ 2/3 cup sugar
  ~ 1 egg white
  ~ 1 teaspoon vanilla
  ~ 1/2 cup boiling water

Directions:
1. Place all ingredients except water into a metal mixing bowl.

2. Turn the mixer on high at the same time as you add the boiling water.

3. Whip on high for 5 minutes, no more, no less. The frosting won't look like frosting until it has been whipped for 5 minutes.


Source: Coleen's Recipes

Sunday, June 19, 2011

Jello Infused Cupcakes

Very simple and delicious! Good way to dress up a boxed cake mix.

Ingredients:
  ~ 1 box white cake mix (plus eggs, water and oil required by mix)
  ~ 1 3oz. box of flavored Jello
  ~ 1 cup boiling water

Directions:

1. Prepare cupcakes according to box.

2. Allow cupcakes to cool for 10 minutes in pan.

3. Using a straw or fork, poke a hole (or holes) in the top of the cupcakes.

4. In a separate bowl, mix Jello powder and boiling water until the power is completely dissolved.

5. Pour Jello liquid into holes, being careful not to spill any (it will set like regular Jello and will get sticky and messy).

6. Put cupcake pans in refrigerator for 30 minutes.

7. Frost with whatever frosting you prefer (I used this frosting).

Saturday, June 18, 2011

Sausage Stuffing for a Turkey

This recipe has been passed down from my grandmother to my mom to me.. It's not your typical Thanksgiving stuffing..

Ingredients:
  ~ 2 1/2 sticks unsalted margarine
  ~ 4 stalks of celery, chopped
  ~ 1 onion, chopped
  ~ salt
  ~ pepper
  ~ poultry seasoning
  ~ 2 cups chicken broth
  ~ 1 box Bell stuffing
  ~ 2 lbs ground beef
  ~ 1 roll of sausage

Directions:
1. Melt 1 stick of butter in a large frying pan.

2. Chop the celery and onion and add to the melted butter. Allow them to cook for a minute or two, to soak up some of the butter.

3. Add the meat, using a wooden spatula to break the beef and sausage into small-ish pieces. Sprinkle salt, pepper and poultry seasoning over the pan.

4. In a separate pan, melt the remaining butter.

5. In a large bowl, combine the stuffing mix, butter and chicken broth.
 
6. Gradually add to the pan of meat and mix well.

7. Cool completely before putting in the turkey.

Friday, June 17, 2011

Chocolate Chocolate Chip Cookies

Ingredients:
  ~ 2 1/4 cups flour
  ~ 1 teaspoon salt
  ~ 1 teaspoon baking soda
  ~ 2 sticks unsalted margarine, softened
  ~ 1 cup sugar
  ~ 1 cup packed brown sugar
  ~ 2 eggs
  ~ 1 tablespoon vanilla
  ~ 1/2 cup unsweetened cocoa
  ~ 1 bag of chocolate chips

Directions:
1. Preheat oven to 375°.

2. In a medium bowl, combine flour, salt and baking soda.

3. Using a mixer, combine butter, both sugars, eggs, vanilla and cocoa. Gradually add the flour mixture and mix until well combined.

4. Stir in chocolate chips using a wooden spoon. 

5. Drop cookies on cookie sheet using a spoon.

6. Bake for 8-10 minutes and cool on a baking rack.


Source: Food Network

Thursday, June 16, 2011

Dairy-Free Whipped Cream

I've never been able to have Whipped Cream... but whenever it is at a family gathering, I love to smell it. I know that sounds weird, but it just smells amazing! Out of all of the dairy things that I've never been able to have, the only one I've ever really wanted was whipped cream. Cheese? Eck. Milk? Eck. Whipped cream? mmmmm I didn't think that this recipe was over the top delicious, and neither did my real whipped cream loving husband, but I think it's okay mixed with other things, or on top of fruit. By itself, it leaves a kinda strange aftertaste..

Serves: Not very many..

Ingredients:
  ~ 1/4 cup soy milk
  ~ 1/2 cup vegetable oil
  ~ 1 tablespoon maple syrup
  ~ 1/2 teaspoon vanilla extract

Directions:
1. Pour soy milk and 1/4 cup of vegetable oil in a blender. Combine on highest speed.

2. Drizzle remaining (1/4 cup) vegetable oil in, and continue blending.

3. Add maple syrup and vanilla (original recipe said to only add vanilla if you weren't using vanilla soy milk. I used vanilla soy milk and still thought it needed it.)

4. If it isn't thick enough, you can add more vegetable oil. It doesn't get all fluffy and thick like regular whipped cream though because soy milk doesn't have the fat that regular milk/cream does.

Monday, June 13, 2011

Ooh La La Peanut Butter Pie (For Dogs)

Today is our beautiful little girl (who just happens to be a dog)'s fourth birthday. We can't believe it has already been four years!! But at the same time, we can't even remember life before her!

So when her birthday comes around, she always gets a big special doggie treat. She doesn't eat any people food (aside from a couple fruits and vegetables that she loves), so something different is always special. Something that to her is "people food". Last year she got Carrot Muffins. This year Peanut Butter Pie. (Carrots and Peanut Butter are two of her favorite things!)

Ingredients:
Crust
  ~ 1 1/2 cups of flour
  ~ 1/2 cup vegetable shortening
  ~ 1 teaspoon cinnamon
  ~ 2 tablespoons cold water
Filling
  ~ 1 1/2 teaspoons flour
  ~ 1 cup milk (I used soy milk because that was all we had)
  ~ 2 egg yolks
  ~ 1 cup peanut butter
  ~ 1 tablespoon minced mint, plus whole-leaf mint for garnish (I omitted because I didn't have any)

Directions:
1. Preheat oven to 450°.

2. In a medium bowl, combine flour and shortening until dough forms 1/4" balls. Sprinkle in cinnamon.

3. Sprinkle 1 tablespoon of water at a time over mixture and gently toss with a fork until a crust forms into a ball. (The original recipe said 4-5 tablespoons, but I did 3 and it was too watery.. I had to add more flour.)

4. Flatten pastry ball on a lightly floured surface and roll to a 1/8" thickness.

5. If you want to make mini-pies, cut five 6" crust rounds and fit into 4" mini pie pans and trim excess. I made one large pie, in a regular sized pie pan. 

6. Bake 10-12 minutes and cool.

7. Place all filling ingredients in a blender and blend until smooth.

8. Pour into a saucepan and cook over medium heat until mixture thickens. Do not let mixture boil!!

9. Cool and pour into pie shell(s). Refrigerate until set.

10. Before serving, you could garnish with a bit of cream cheese and fresh mint.

Source: The Good Treats Cookbook for Dogs 

Thursday, June 9, 2011

Hot Dog and Potato Skillet Dinner

Sometimes I make things up. Especially when I didn't have time to get to the grocery store all week and the only form of meat we have in the house is a bag of hot dogs in the freezer and three cans of tuna fish. It's summertime, so my husband would have been perfectly content having hot dogs on the grill and some macaroni salad, but frankly, it's only the beginning of June and I'm already getting sick of that. After a very intensive search of "hot dog recipes", I finally came across one that didn't seem entirely gross. And I could make it happen (somewhat) with the few things I had on hand. I did make a couple changes though. Here's the original recipe from Betty Crocker. As strange as it looked (and as strange as the ingredients sound), it was incredibly easy and pretty yummy.

Serves: 2

Ingredients:
~ One can of sliced potatoes (healthy, I know.. but I didn't have any "real" potatoes)
~ 1/2 cup soy milk
~ 2-3 tablespoons of flour
~ Salt
~ Frozen green peas
~ 3 hot dogs (uncooked, but not frozen)

Directions:
1. In a large skillet, combine can of potatoes, soy milk, salt (as little or as much as you'd like. I don't like a lot.) and flour. Stir until the potatoes are completely coated and the flour is completely combined (not clumpy).

2. Add the peas (again... as many or as few as you'd like. Here I like a lot.) and stir until they are separated from each other and coated in the "cream" sauce.

3. Allow it to simmer on medium heat for a couple minutes.

4. Slice the hot dogs into 1/4" slices. Add to the skillet.

5. Stir until everything is coated by the sauce.

6. Serve. (and field questions from your husband about what this weird dinner you're serving him is).

Wednesday, June 8, 2011

Tropical Rice

I absolutely love rice! I eat a lot of it. And this is one of my favorite ways to make it. It combines rice with two of my other favorite foods, pineapple and coconut, and is incredibly simple! I always make much more than we can possibly eat for dinner, just to make sure that I have leftovers for lunch the next day.

Serves: 4-6

Ingredients:
  ~ 2 cups of uncooked rice (regular or instant)
  ~ 1 can of crushed pineapple (roughly 20 ounces)
  ~ 1/4 cup of shredded coconut

Directions:
1. Cook the rice. Doesn't matter if you do this on the stovetop or in the microwave. Just prepare it however you usually do.

2. In a large baking dish (I use a large Corningware dish), mix the cooked rice, coconut and pineapple. You don't have to use the amounts of coconut and pineapple that I listed above. Add as much or as little as you'd like.

3. Bake in a pre-heated oven for roughly 15-20 minutes. I never cook it at the same temperature or for the same amount of time. I usually make this when I'm cooking something else in the oven, and just keep checking on it to make sure it isn't burning. You do want the top to look a little crispy though.. that's what adds to the amazing taste!

Sunday, June 5, 2011

Oven French Fries

Source: food.com

Serves: 3

Ingredients:

  • 8 potatoes
  • 1-2 tablespoons of olive oil
  • salt
  • Cooking spray
Directions: 
  1. Wash potatoes and cut them into french fry sized strips.
  2. Put the strips in a bowl of cool water to wash some of the starch out of them.
  3. Drain the potatoes well, then add the olive oil and a little bit of salt to the bowl.
  4. Mix well, until all of the potatoes are coated.
  5. Spray a cookie sheet with the cooking spray and place the potatoes flat on top.
  6. Cook at 350° for 20-25 minutes. For the last 5 minutes or so, cook under the broiler.

Friday, May 27, 2011

Crunchy Nacho Dogs

Source: Betty Crocker

Serves: 4

Ingredients:

  • 1 can (8 oz) Pillsbury refrigerated crescent rolls
  • 4 slices American cheese
  • 4 hot dogs
  • 1 tablespoon milk (I omitted)
  • 1/2 cup crushed nacho cheese-flavored tortilla chips (I used regular tortilla chips)
Directions: 
  1. Pre-heat oven to 375°. Lightly grease cookie sheet, or cover sheet with tin foil.
  2. Unroll crescent rolls. Separate dough into 4 rectangles (each rectangle will be 2 crescent rolls). Firmly press perforations to seal.
  3. Place cheese slices on rectangles if you want.
  4. Place hot dog close to the end of a rectangle and roll up the dough. Press edges to seal. 
  5. Brush rolls with milk (I didn't do this.. they stuck fine without the milk). Roll in crushed tortilla chips.
  6. Place the rolls, seam side down, on the cookie sheet.
  7. Bake for 15-22 minutes or until a deep golden brown.

We only ate one hot dog each, and put the other two (already cooked) in the refrigerator. They were a great, easy lunch the next day and tasted just as good as the previous night.

Thursday, May 26, 2011

Twice Baked Potatoes

Without Cheese
With Cheese and Sour Cream
Source: The Pioneer Woman

Serves: 4

Ingredients:

  • 8 Baking Potatoes
  • 2 sticks of Unsalted Margarine
  • 1 cup bacon bits (I used Hormel's Real Crumbled Bacon)
  • 1 cup Sour Cream (I used 1/2 cup because only half of the potatoes had it)
  • 1/4 teaspoon Lawry's Seasoned Salt (I used a Sicilian salt blend that I love) 
  • 1 cup grated cheddar or jack cheese (I only used 1/2 cup, and used a Mexican blend  that had both cheddar and jack) 
  • Green Onion (optional)
  • Ground Black Pepper
Directions: 
  1. Pre-heat oven to 400°. Wash potatoes and cut a small "x" in the top. Bake for an hour and 15 minutes, or until they are completely cooked. Pioneer Woman suggests baking them on a cookie sheet, which I had never done before, but worked pretty well.
  2. Slice the sticks of butter into 1/4" thick pieces (you don't need to be exact), and throw them in a bowl.
  3. Add the bacon bits and sour cream to the bowl. I used two separate bowls, one with sour cream and one without. Just split up the other ingredients between the two bowls.
  4.  As soon as the potatoes come out of the oven, slice them in half lengthwise. Pioneer Woman suggested holding them with a towel because they're so hot and it worked perfectly.
  5. Scoop out the insides of the potatoes into the bowl with the butter, bacon and sour cream. Be careful not to tear the potato skin, but if you do it will be okay. I left a little bit of potato behind, to give the shells a little bit of rigidity.  
  6. Place the empty potato skins back on the cookie sheet.
  7. Using a potato masher, mix all of the ingredients in the bowl. I usually use a mixer to make mashed potatoes, but for some reason these taste better when they're a little lumpy.
  8. Add the seasoned salt and black pepper to the bowl, and continue mashing. You can also add a cup of the grated cheese or chopped green onion if you want.
  9.  Fill the shells with the potato mixture. You don't need to be neat about it. I then sprinkled cheese on the tops of half of them.
  10. Bake in a 350° oven for 15 to 20 minutes (I kept them in for 20 minutes because I like the tops a little crispy).
  11. Apparently you can also freeze them in Ziploc bags. I haven't tried this, but I will next time because they're so delicious and would be perfect for nights I don't feel like cooking. Just take them out of the freezer and pop them in the oven. 

Wednesday, May 25, 2011

Lemonade

Source: Paula Deen

Makes: 1 gallon

Ingredients:

  •  2 cups sugar
  • 1 cup hot water
  • 2 cups lemon juice
  • 1 gallon cold water
  • 1 lemon, sliced
  • mint sprigs, for garnish
Directions: 
  1. In a 1-gallon container, combine sugar and hot water. Stir until the sugar is completely dissolved.
  2. Add the lemon juice and cold water until the liquid is up to the 1-gallon mark (you'll add a little less than 1 gallon of cold water).
  3. Squeeze a lemon slice into each glass of lemonade, and garnish with a mint sprig.

Friday, May 20, 2011

Fruit Crisp

Source: Better Homes & Gardens New Cookbook: Bridal Edition

Serves: 6

Ingredients:

  • 5 cups sliced apples or peaches
  • 1/2 cup rolled oats
  • 1/2 cup packed brown sugar
  • 1/4 cup flour
  • 1/4 teaspoon ground nutmeg or cinnamon (nutmeg for peaches, cinnamon for apples)
  • 1/4 cup unsalted margarine
  • 1/4 cup chopped nuts or coconut (optional)
Directions: 
  1. Apple Crisp: combine white sugar and cinnamon (in addition to the sugar and cinnamon listed above) with the sliced apples. Stir frequently, and let them sit until a syrup has formed. Don't do this if you're using peaches.
  2. Place fruit in a large casserole pan (I usually use a 9x13 pan). Spread evenly.
  3. In a large bowl, combine the remaining ingredients, except for the margarine. Cut in butter until the mixture is crumbly (I've found that using your hands is the easiest way to do this... just be sure to wash your hands thoroughly before).
  4. Sprinkle the dry topping over the fruit.
  5. Bake at 375° for 30-35 minutes. We serve warm with vanilla frozen yogurt.

Friday, May 13, 2011

Green Beans Almandine

Source: Better Homes & Gardens New Cookbook: Bridal Edition

Serves: 3

Ingredients:


  • 8 ounces green beans (or one 9 ounce package of frozen green beans
  • 2 tablespoons slivered almonds
  • 1 tablespoon unsalted margarine
  • 1 tablespoon lemon juice
Directions: 
  1. Cut fresh green beans into 1" pieces. Cook, covered, in a small amount of salted boiling water.
  2. Meanwhile, in a small saucepan, cook and stir almonds into melted butter over medium heat.
  3. Remove from heat and stir in lemon juice.
  4. Stir almond mixture into green beans.

Thursday, May 5, 2011

Brown Sugar-Glazed Carrots

Source: Better Homes & Gardens New Cookbook: Bridal Edition

Serves: 4

Ingredients:

  • 1 pound medium carrots, peeled
  • 1 tablespoon butter or margarine
  • 1 tablespoon brown sugar
Directions: 
  1. Cut the carrots into 1 1/2-2" pieces, then cut in half lengthwise.
  2. In a medium saucepan, cook carrots covered in lightly salted boiling water.
  3. Drain and remove from pan.
  4. In the same saucepan combine butter, brown sugar and a dash of salt. Cook and stir over medium heat until well combined. Add the carrots and cook, uncovered, for about 2 minutes or until glazed, stirring frequently.

Wednesday, April 6, 2011

Dairy-Free Tater Tot Casserole

Source: Inspired by Michelle Duggar's Tater Tot Casserole

Serves: 4

Ingredients:

  • Tater tots, uncooked
  • Cooked meat (ground beef, ground turkey, chicken...)
  • Seasonings
  • 1 1/2 cups chicken broth
  • 3 tablespoons soy milk
  • 4 tablespoons flour
  • 2 cans Green beans, or any other vegetable you prefer
Directions: 
  1. Cook meat in a skillet, with or without seasonings. I used 2 patties of ground beef and cooked it with salt, pepper, onion powder and garlic powder.
  2. In a small saucepan, combine chicken broth, soy milk, flour and some more onion and garlic powder. Stir until thick. Don't worry if there are a couple lumps.
  3. Spread the cooked meat in the bottom of a 13x9 glass baking pan. Spread vegetables over the top.
  4. Pour the broth mixture over the top of the vegetables, being sure to cover the whole pan.
  5. Top it off with as many tater tots as you'd like (the more the better, though it may affect your total cooking time).
  6. Bake in a pre-heated 350° oven for 45-60 minutes, or until the tater tots are fully cooked.

Sunday, March 27, 2011

Deep-Dish Pizza

Source: The New Best Recipe Cookbook (America's Test Kitchen)

Serves: 4

Ingredients:

  • 1 medium baking potato, peeled and quartered (this sounds really weird, but the dough was amazing! Don't skip this ingredient!!)
  • 3 1/2 cups unbleached all-purpose flour
  • 1 1/2 teaspoons instant yeast
  • 1 3/4 teaspoons salt
  • 1 cup warm water (about 110 degrees)
  • 6 tablespoons extra-virgin olive oil, plus more for oiling the bowl
Directions: 
  1. Bring 1 quart of water and the potato to a boil in a small saucepan over medium-high heat; cook until the potato is tender, 10 to 15 minutes. Drain the potato and cool until it can be handled comfortably.
  2. Press through the fine disk on a potato ricer or grate on the large holes of a box grater. (The grater worked perfectly for me.) Measure 1 1/3 cups lightly packed potato; discard the remaining potato. (I saved the remaining potato to make hash browns the next morning.)
  3. Adjust one oven rack to the highest position and the other rack to the lowest position. Heat the oven to 200°. Once the temperature reaches 200°, maintain the heat for 10 minutes, then turn off the heat.
  4. Combine the flour, yeast, and salt in a food processor. With the motor running, add the water and process until the dough comes together in a shaggy ball. 
  5. Add the potato and process for several seconds, then add 2 tablespoons of the oil and process several more seconds, until the dough is smooth and slightly sticky.
  6. Transfer the dough to a lightly oiled medium bowl, turn to coat with oil, and cover the bowl tightly with plastic wrap. Place in the warmed oven until the dough is soft and spongy and doubled in size (approximately 30-35 minutes).
  7. Oil the bottom of a 14-inch deep-dish pizza pan (**see the note at the bottom if you don't have a deep-dish pizza pan, or need to make 2 smaller pizzas, like I did.) with the remaining 4 tablespoons of olive oil.
  8. Remove the dough from the oven and gently punch down; tun the dough onto a clean, dry work surface and pat into a 12-inch round. Transfer the round to the oiled pan, cover with plastic wrap, and let rest until the dough no longer resists shaping, about 10 minutes.
  9. Place a pizza stone or rimless baking sheet on the lowest oven rack (do not use an insulated cookie sheet. If you don't have either of these, turn a regular cookie sheet upside down) and preheat the oven to 500°. 
  10. Uncover the dough and pull it to the edges and up the sides of the pan to form a 1-inch high lip. Cover with plastic wrap and let rise in a warm, draft-free spot until doubled in size, about 30 minutes.
  11. Uncover the dough and prick generously with a fork. Reduce the oven temperature to 425° and bake on the heated stone or baking sheet until the crust is dry and lightly browned, about 15 minutes. 
  12. Add the desired toppings. (We used diced tomatoes, browned hamburger with Italian seasoning and Mozzarella and Parmesan cheese (cheese only on one pizza).)
  13.  Bake on the stone/sheet until the cheese melts, 10 to 15 minutes.
  14. Move the pizza to the top rack and bake until the cheese is golden brown in spots, about 5 minutes longer. To make sure the crust is done, use a spatula to lift up the crust - it should be nicely browned underneath. 
  15. Let cool for 5 minutes, then, holding the pizza pan at an angle with one hand, use a wide spatula to slide the pizza from the pan to a cutting board. Cut into wedges and serve.

 **If you don't have a deep-dish pizza pan or need to make two smaller pizzas**

I used two 9-inch cake pans. Prepare everything according to the above directions, splitting up the ingredients as necessary (ie. half the dough in each pan, half of the olive oil to grease each pan, half of the toppings on each pizza, etc.). Instead of patting each half into 12-inch rounds, make 8-inch rounds. Decrease the cook time on the lower rack to 5-10 minutes, though this seemed a little long for mine. The crust was a little browner on the bottom than I would have liked. I did 6 minutes on the lower rack and 6 minutes on the upper. Next time I will probably do 6 minutes on the bottom and 4 on the top.
 

Monday, March 21, 2011

Baked Chicken with Peaches

Source: AllRecipes.com

Serves: 4

Ingredients:


  • 4 skinless chicken breasts or tenderloins
  • 1/2 cup brown sugar
  • 2 peaches, sliced (I used one can of sliced peaches)
  • 1/8 teaspoon ground ginger
  • 1/8 ground cloves (I used nutmeg)
  • 2 tablespoons fresh lemon juice

Directions: 
  1. Pre-heat oven to 350° and lightly grease a 9x13 baking pan.
  2. Place chicken in the baking pan and sprinkle with half of the brown sugar. Place the peach slices on top of the chicken and sprinkle the other half of the brown sugar on top. Then sprinkle the ginger, cloves and lemon juice over that.
  3. Bake for about 30 minutes.